Start To Making
Now it may sound weird at first but I only used the one type of brush, the hard edge not for any particular reason nor do I not use other brushes I just fell that this gives me the most control. The only adjustments I make to these settings are to the opacity and flow and in my own case I change the, flow, opacity and size jitters respectively to ‘pen pressure’ (
Fig.01) only because I’m using a Wacom tablet.
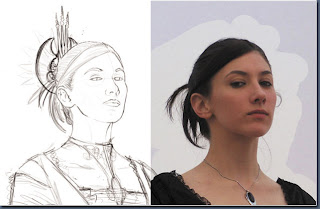
If you are using a mouse making the last three changes will have no affect what so ever. I usually sketch out the image I intend to paint by hand, scanning it in as a guide and adjusting the levels to make the lines stand out a bit more (
Fig.02)
| In this case however I used both my original sketch and added to it in Photoshop. I employ the talents of my associate Samantha (Sam) to act as model for the young woman and base the facial expression and skin tones on hers. (Fig.03). Before I block in any colour I make four separate layers, the bottom being skin, the next being the garments beneath her long dress and finally one for the dress itself. |
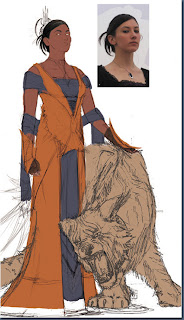
With Sam’s face sketched into the image, and enough separate layers to easily be able to adjust things down the track, I begin the blocking in phase. I settle on an Orange and blue/violet colour (
Fig.03) scheme in order to avoid the cliché elegant queen or princess dressed in white flowing garb. I’ve also established that her cat companion will be a white creature not unlike a white tiger or lion so I’ve based its skin as beige, this will also help contrast between the two subjects. Concerning her skin tone, the original photo shoot with Sam was in a poorly lit room so some adjustment will be necessary to accommodate the fact that the image is light with sunlight in mind. For now though I simply select the darkest tone of her skin in the photo I selected, in this case the point of deepest shadow was beneath her chin. This allows me to more easily build on her skin tone with white and pink highlights.

| Using the hard edge at about 50% opacity I lay down some highlights and darken the shadowed areas of her face. I also make her lips redder to suggest cosmetics of some sort. As I continue this process I am constantly sampling the shades that appear in-between the darker and lighter tones due to how mush pressure I am putting on the stylus. I also block in hair and eyebrows to better adjust the shadows around the eyes and see if the skin colour is heading in the right direction. Once I feel I’ve created an accurate enough bridge between the light and dark elements of her face I give the whole thing a once over with the smooth tool at 15% opacity to soften her features. Next I add her eyes and darken the edge of the lids to suggest more cosmetics and put a slight highlight to her hair and give the hanging strands some direction with the smudge tool at 20%. (Fig.04). |

This trend continues into the blocking out of the tones in her dress. (Fig.05) Using the burnt orange to increase the highlights and darken the shadows in the folds of the fabric. I modify the ‘wing’ for lack of a better word (I’m not a seamstress after all) on the front of her dress to look more like a shield and follow the form of her body more closely. |
| I want to make her dress look less plain and more ornate so I decide to include a pattern to the blue of her upper dress and to the draping fabric down her legs (Fig.06) firstly making another layer so I don’t do anything I can’t take back. |
| I settle on the design and flatten the blue dress layer and the pattern layer together and adjust it to fit the folds of the fabric across her chest, around her shoulders and down the front of her dress. (Fig.07 & 8). |
|
|
| | | | | | | | | | | | | | | | | | | |
Meanwhile the cats head follows the same process (Fig.09a, b, c) of laying down tone then slowly building up the detail, including eyes, adding teeth and finally adding a lightly striped pattern to its fur both on its face, neck and legs.
Once I’ve got the two of them completed for the moment I assess the background (Fig.09) not honestly having had much thought about it until now. Using some 3d modelling I establish a basis for shadow and perspective of a sheer stone wall. Once I’ve added in brickwork and the subject’s shadows cast along the stony floor I decide that some wall hangings are desperately needed to fill in the blank space.
As a finishing touch I add in the notion of blossoming trees, somewhere out of sight, by adding petals to a layer above the rest. (Fig.11).


No comments:
Post a Comment