Thursday, 16 June 2011

Create realistic rocks and blend them into your scene

visitors asked me for a photoshop tutorial showing how I did the rocks in the realistic alien water scene were made.Learn how to make realistic rocks with this photoshop tutorialHere goes...
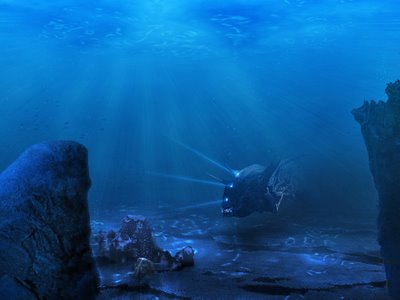
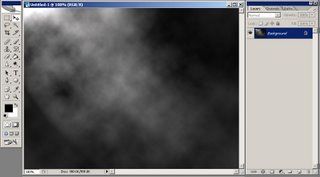
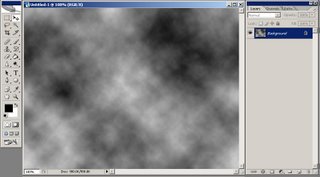
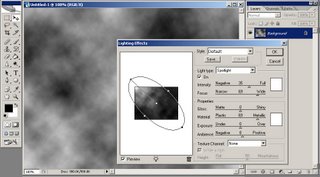
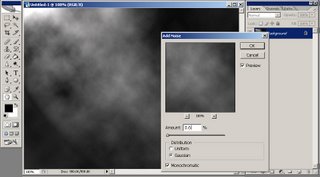
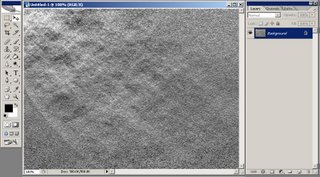
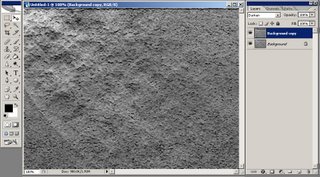
Open a new document, mine is 640x480 px then go to the Filter menu and choose Render > Difference Clouds.Learn how to make realistic rocks with this photoshop tutorialNow go to Filter > Render > Lighting Effects and select your light (spotlight) to come from top-left corner of your image, leaving all the other settings intact, like you see in my image below:Learn how to make realistic rocks with this photoshop tutorialYour result should be similar to this:Learn how to make realistic rocks with this photoshop tutorialThen go to Filter > Noise > Add Noise and set the Amount to 0.6%, Distribution to Gaussian and check Monochromatic.Learn how to make realistic rocks with this photoshop tutorialApply a Bas relief filter (from Filter > Sketch > Bas Relief) with the following values: Detail: 15, Smoothness: 2, Light: Top.Learn how to make realistic rocks with this photoshop tutorialNow duplicate your background layer (go to Layer > Duplicate Layer...) and then aplly a Craquelure filter (Filter > Texture > Craquelure) with the following values: Crack Spacing:80, Crack Depth:4, Crack Brightness:5.Learn how to make realistic rocks with this photoshop tutorialUsing the Lasso Tool make a selection like you want your rock to look like. Flatten your image (go to Layer > Flatten Image) and copy from the new layer created.
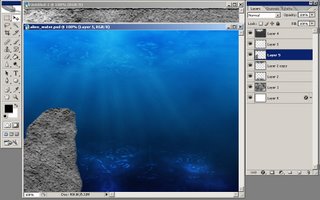
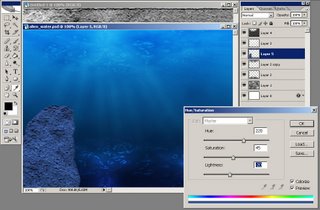
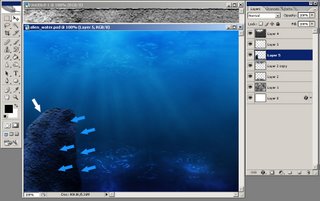
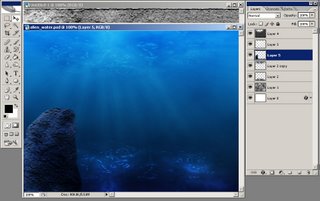
Open the image you want to blend your rock into. Paste the rock into a new layerLearn how to make realistic rocks with this photoshop tutorial then press CTRL+U in order to modify the Hue/Saturation: check Colorize then use the following values Hue:220, Saturation:45, Lightness:-20.Learn how to make realistic rocks with this photoshop tutorialNow you must darken some parts of your rock and lighten others. I darkened the right part of my rock using the Burn Tool and lightened the upper part using the Dodge Tool (on the next image you have blue arrows to show you where I've used the Burn Tool and a White arrow to show you where I've used the Dodge Tool).Learn how to make realistic rocks with this photoshop tutorialUsing the Burn Tool with a small brush selected make more cracks into our rock.Learn how to make realistic rocks with this photoshop tutorialHope you liked this photoshop tutorial. Thank you!
I will be back with many more, until then check out some of my other photoshop tutorials:

Burning Candle

Post Pic

In this lesson I’ll tell in details how to draw burning candle. The flame is in general complex enough theme, and there is a set of ways to draw it. I’ll show you one of them which I use.

Step 1. No effects will rescue figure if it is wrong for constructing. It is better to give to this step enough attention because to correct a mistake will be then practically impossible. But first of all - color of a background. I choose dark-brown. Then we take a brush, and on a separate layer draw auxiliary lines. They will help to represent a candle correctly.
Draw burning candle in Photoshop CS2
Step 2. When the sketch will be ready, we start to work with fire. For this purpose we create a group, and call it fire, and in it we create a layer fire. Blending Mode of group (not a layer, namely group) it is changed on Color Dodge. Then we choose white color, we take the Brush Tool (Opacity: 10 %), also we draw fire.
Draw burning candle in Photoshop CS2
Step 3. We return brushes Opacity - 100 %. What to start drawing a candle, we need to choose three colors: the basic, is darker than the core and brighter. The most light part - top, then bottom right, and the most dark - bottom left. On a sketch it is drawn a candle of the form of a smooth parallelepiped.
Draw burning candle in Photoshop CS2
Step 4. With the Blur Tool we soften corners. Transition between colors becomes soft, but lines should remain direct and equal.
Draw burning candle in Photoshop CS2
Step 5. We draw a candle, which only pair seconds back was burned. Therefore on it should not be a drop of the fallen asleep wax and dimples at a match. But as the candle conceals quickly enough, we’ll draw a drop of hot wax under fire. For this purpose we use Brush Tool and Blur Tool.
Draw burning candle in Photoshop CS2
Step 6. And nevertheless wax has had time to flow down a little on a wall of a candle. We draw a drop the Brush Tool (two shades, more light and more dark, than a background on which we draw it) then we smear it by means of the Blur Tool. We do not forget to draw a shadow (even with more dark shade).
Draw burning candle in Photoshop CS2
Step 7. We create reflection of the flame. We copy a layer with fire, insert into the same group, we reflect it on a vertical. We have exactly under a flame, and by the Eraser Tool we wipe superfluous.
Draw burning candle in Photoshop CS2
Step 8. The candle too should be reflected from a surface on which it stays. To create this reflection, we allocate a small part of a candle from below, we copy and it is inserted on a new layer. Fill a layer about 45 % are lowered, an elastic band we create effect of gradual disappearance. Then by help of the Burn Tool we draw a shadow between candles and a surface. Then we choose a usual brush of black color and we draw a match.
Draw burning candle in Photoshop CS2
Step 9. We draw the match (its tip should be an orange shade since it is heated by a flame).
Draw burning candle in Photoshop CS2
Step 10. There is flame, it is time to draw light which it creates. Using the Dodge Tool (Highlights, 100 %), we clarify a drop of wax.
Draw burning candle in Photoshop CS2
Step 11. Then by the same tool we clarify the top part of a candle. It should be the most light.
Draw burning candle in Photoshop CS2
Step 12. To draw smoke, we’ll create a New layer in group Fire. We choose white color (Opacity: 30 %), a brush it is adjusted, as on pictures. Reducing the sizes of a brush, we draw smoke.
Draw burning candle in Photoshop CS2
Step 13. We start working with light. To draw rays, we will have to Create new group (with precisely same adjustments as group fire) and to place it the last in the list of layers (the lowest, not including the background). Using the same brush (Opacity: 50 %), we draw a circle from a fog around of the candle (the more close to the center, the more brightly).
Draw burning candle in Photoshop CS2
Step 14. Let’s apply to it filter Blur - Radial Blur with adjustments, as on pictures. Then press three times of a combination of keys Ctrl+F to repeat this action three more times.
Draw burning candle in Photoshop CS2
Step 15. Let’s black out a little bottom of the candle. For this purpose we use Burn Tool (midtones, 50 %).
Draw burning candle in Photoshop CS2
Step 16. With the same tool we’ll black out edges of a background. It will make light from a candle even brighter.
Draw burning candle in Photoshop CS2
Step 17. Let’s make color of a candle more sated. For this purpose we choose Airbrush Soft Round, the size big (on all leaf), Opacity: 50 %, also we draw something similar to a fog of the oval form. Then we change mode of a layer on saturation.
Draw burning candle in Photoshop CS2
Step 18. By the Blur Tool we smear the internal area of a flame (including on layers with a drop of wax, from candles). Now fire looks more plausible.
Draw burning candle in Photoshop CS2
Step 19. We change brightness and contrast (Image - Adjustments - Brightness/Contrast) of the layer with reflection of a candle to receive a violet shade.
Draw burning candle in Photoshop CS2
Step 20. Using keys Ctrl+U, we cause menu Hue/Saturation, and we change adjustments as on picture.
Draw burning candle in Photoshop CS2
Step 21. The smoke has turned out too bright. We will correct it by the Eraser Tool (Opacity: 35 %).
Draw burning candle in Photoshop CS2
Step 22. By means of usual brushes we draw near a candle - a match. Representing an easy smoke which proceeds from it, we show that a candle was lighted up several instants ago. We do not forget to put a shadow and light, to give matches the correct form.
Draw burning candle in Photoshop CS2
Step 23. By means of Dodge Tool on low adjustments, we’ll clarify a surface around the candle since on it rays of light too fall. As I cut out a superfluous part of a cloth by means of crop tool, that the candle would take of the central position.
Draw burning candle in Photoshop CS2
Step 24. By Dodge Tool (Highlights, 65 %) we’ll clarify the top part of a candle because wax passes light.
Draw burning candle in Photoshop CS2
Step 25. By means of Smudge Tool we’ll extend the flame. And smoke we will lift a little above.
Draw burning candle in Photoshop CS2
Step 26. We correct a drop of wax. Because it is closed from direct rays of light, it can not be such bright. It should even be a little bit darker than a background on which it is located. We use Eraser Tool and Burn Tool.
Draw burning candle in Photoshop CS2
Step 27. The last touch. By means of Burn Tool (Highlights, 50 %) we draw a shadow from the candle.
Draw burning candle in Photoshop CS2
It is ready. I hope, the lesson is written in accessible language and it is useful to you in work with the Adobe Photoshop.
Draw burning candle in Photoshop CS2

Create a Realistic Landscape from Scratch with a Graphic Tablet


Create a Realistic Landscape from Scratch with a Graphic Tablet Final Image


Step 1

First things first, the use of a graphic tablet is a must for this tutorial. This tutorial is made in CS3 but for most older versions of photoshop there shouldn't be a problem because the tecnniques used are scarce.
The main tools used are gradient tool and smudge tool.
Good luck and have fun!

Make a new file with the dimensions width 1280px and height 800px.
Use the colorpicker tool to collect colors from a photo or painting, this helps to get a more realistic feel to the end result. Blurring a photo or using the filter paint daubs with a large brush size and sharpness 0 helps to get the colors. I marked the places where I took the colors. Don't just click anywhere, use the darkest blue from the sky, the colors which give depth to the picture and some foreground colors.

Step 2

Use the gradient tool to set the colors for the background. Use three of the colors you have just picked.
The darkest blue from the sky, the lighter white/gray also from the sky and a color from the foreground.

Step 3

Make a new layer for every new object, very useful when you need to change or add things to the illustration in a later stage.
Add a new layer.
Select the polygonnal lasso tool and use it to make the outlines for the mountains in the background as shown below.
Now select the gradient tool and fill the new shape with the two colors shown on the right. The mountaintops should be a bit darker.

Step 4

Make the remaining three layers of mountains the same way as desribed in the previous step.
Use the polyganol lasso tool and fill the layer using the gradient tool.
Use the colors you picked from your reference image.
Don't forget that the mountaintops should be a bit darker, this is done to create a fog effect at the foot of these mountains.

Step 5

Make the lake, the rocks and the foreground the same way as you made the mountains. Be creative about the shapes, there are endless posibilities.
After you are done making the shapes, flatten the four layers with the background mountains into one layer. Also flatten the lake, the rocks and the shapes that make up the foreground into another layer.
Name the layers, "background", "mountains" and "foreground". Always name your layers, so when you have a complicated file with lots of layers it's much easier for yourself but also for someone else to see how the image is build.

Step 6

Make a lightsource coming from the right.(By choice you could make it come from the left.)
Set the foreground color to white.
Use the gradient tool, set to "foreground to transparent", the mode should be "color dodge", the opacity setting on a low value, I chose 12%.
Select the layer "background".
Click on the rightside in the middle of the image and drag the pointer to the center of the image, release at that center.
Now select the layer "mountains" and again drag the pointer to the center of the image and release.

Step 7

Use the smudge tool to create details in the most distant mountainline, set the diameter to a low value. I used a setting of 4 pixels. If you use a smaller diameter you can give the image more detail.
You can activate the option "Finger Painting" for different kind of effects.
Start smudging with a lot of pressure from just above the mountaintops in a bend or corner down and to the right untill just above the next line of mountains. Smudge these strong lines into the mountain ridges. What you are actually doing is smudge away parts of the mountains so the background color can shine through. You can hide the background layer to see the effect.
Do the same for the three remaining groups of mountains.
Keep in mind that the light is coming from the right, and that the darker mountains are much closer that the faint colored mountains.
And don't worry if the effects that you achieve are not what you expected, it takes some practise. I always tip people to look at real pictures of the subject you want to draw as a reference.
In the next step there is a more detailed explanation of how to smudge the mountains into shape.

Step 8

Smudging the mountaintops: Smudge in the direction of the red arrows.
Darker red means more strength.

Smudge diameter is set to 4 pixels, option Finger Painting is selected.

Step 9

Use the same technique when smudging the foreground into shape, but set the brush diameter a bit larger to 6 or 8px.
Also select the option "sample all layers". This means that you can smudge the color from the background into the foreground layer without distorting the background layer. This option could also have been set when smudging the background mountains to get a different effect.
Don't forget about the lightsource, and start smudging down from the corners with a lot of pressure.

Step 10

Use the same technique for the water and the rest of the foreground, but this time when smudging make a lot of "uncontrolled" movements like circles and twisted lines.
Use a diameter between 2 and 8px. Use the smaller brush to create more details.

Step 11

Now let's make some clouds.
First make a new layer, call it "clouds" and put it behind the mountains layer and over the background layer.
Select the brush tool and change the brush tip to "dry brush".
This brush should be a standard brush in CS3, no need to change the brush palet. If you are using a different version of photoshop and can't find it, you could just select a similar type of brush.
Bring up the brushes window using F5, the standard menu button or using the menu=>window=>brushes option.
Make sure that the settings are as below, don't forget to adjust control settings to "pen pressure".

Step 12

Start with a brush size of 30 px, but you can vary the size if you want.
Select the colors from your reference image or use your imagination. I used my starting reference image and picked the darkest blue from the sky for the shadow parts, the lightest blue for the highlights and a light pastel color.
I could also have chosen a light purple color or a green tinted color, the sky is full of colors.

Step 13

After you have brushed the colors use the smudge tool to blur the clouds.
Set the brush diameter to 30px.
Use very little pressure smudging the clouds, almost none.
And don't miss a spot, you don't want any of the hard pixels that the dry brush left behind.

Step 14

Make a copy of your file and rename that file "yourfile"2.psd so you have a backup. Now you can safely flatten all the layers.
To make the image more realistic you can zoom in on the different parts and use the smudge and brush tools for details.
You can paint flowers, stones and trees into the scenery.
But for now we are going to finish the image using the "color dodge" and "multiply" modes with a standard brush setting.
Vary the brush diameter from very small to very large. Colors used are black for multiply and white for color dodge.
A tip is to duplicate the one layer you have so you can play around with the different tools and easily make changes undone.

Step 15

Finished result: